Forget Wet Brines: Dry Brine Turkey for Mess-Free Perfection
Thanksgiving, Christmas, or any grand feast calls for a show-stopping turkey – one that boasts golden, crackling skin and succulent, flavorful meat throughout. For too long, the go-to method for achieving this has been the wet brine: a colossal undertaking involving a huge bucket, gallons of seasoned liquid, and often, a hefty dose of mess and stress. But what if we told you there's a simpler, more effective way to elevate your holiday bird to legendary status? It's time to discover the magic of dry brining, a foolproof technique that promises mess-free perfection and a turkey so delicious, your guests will be begging for the recipe.
If you're wondering how to dry brine a turkey, you're in the right place. This revolutionary method bypasses the logistical nightmare of liquid brines, offering a streamlined approach that deepens flavor, tenderizes the meat, and guarantees that coveted crispy skin. Prepare to transform your turkey game forever.
What Exactly is a Dry Brine and How Does it Work?
A dry brine is elegantly simple: it's a seasoning blend, primarily composed of salt and often complemented by herbs, spices, and aromatics, rubbed directly onto the surface of your turkey. Unlike its wet counterpart, which submerges the bird in a saline solution, a dry brine works its wonders from the outside in, without a single drop of excess liquid to contend with. The core of this technique lies in the transformative power of salt.
Here’s the scientific marvel behind it:
- Moisture Extraction: When salt is applied to the turkey, a process called osmosis begins. The salt draws out moisture from the turkey's cells to the surface.
- Salt Dissolution and Flavor Infusion: This extracted moisture dissolves the salt, creating a highly concentrated brine right on the turkey's skin. This saline solution then mingles with any other herbs and spices in your dry brine mixture, absorbing their flavors.
- Reabsorption and Tenderization: Over time, the salted liquid is reabsorbed back into the turkey's meat. As the salt penetrates, it breaks down muscle proteins, making the meat more tender and significantly increasing its capacity to retain moisture during cooking. This is why a dry-brined turkey consistently emerges incredibly juicy.
- Skin Drying: Crucially, as the turkey rests uncovered in the refrigerator, the surface of the skin dries out. This dehydration is the secret to achieving that irresistible, golden, and crispier skin that often eludes traditional roasting methods.
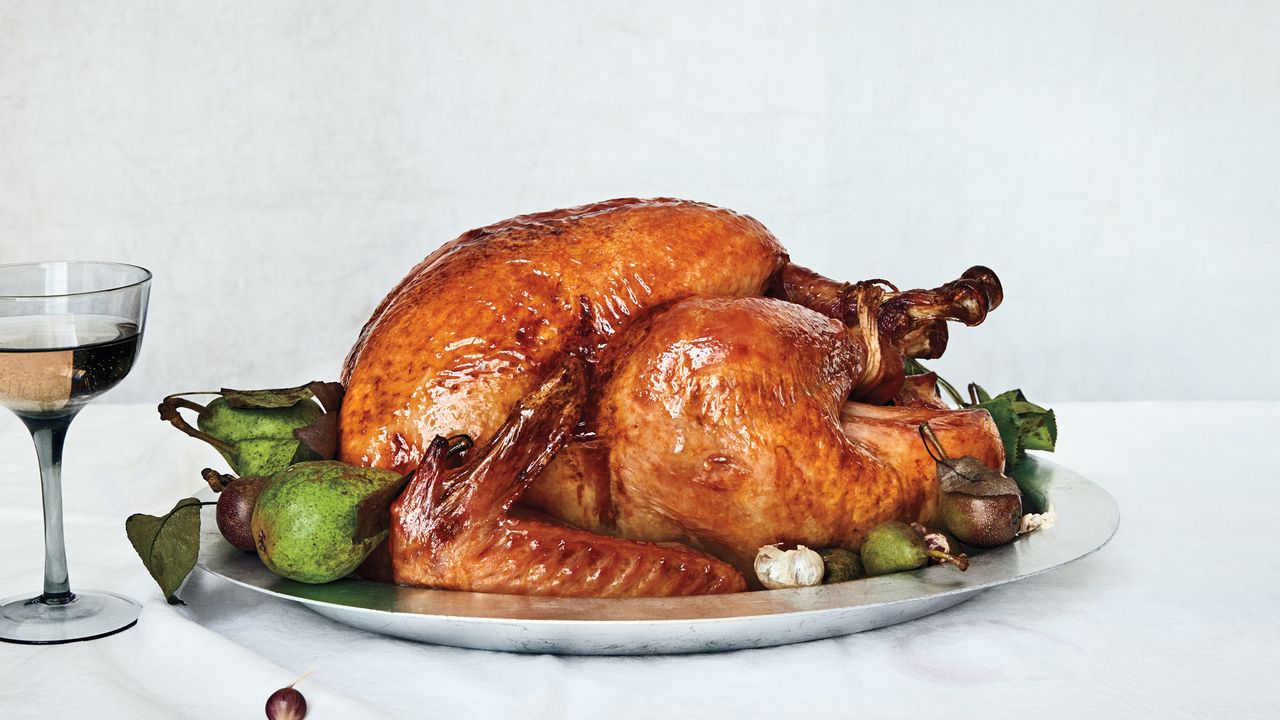
The result? A turkey that’s not only incredibly juicy and tender but also seasoned right through to the bone, with an exterior that crisps to perfection in the oven. It's truly a self-brining marvel that offers depth of flavor and texture you can't get from just seasoning before roasting.
The Step-by-Step Guide: How to Dry Brine a Turkey
Ready to ditch the messy liquid and embrace the simplicity and superiority of a dry brine? Here’s a detailed walkthrough on how to dry brine a turkey for your next celebration:
Step 1: Gather Your Brine Ingredients
The foundation of any good dry brine is salt. Kosher salt is highly recommended due to its flakey texture, which allows for better adherence and easier absorption compared to fine table salt. Avoid iodized salt as it can impart a metallic taste.
For a classic, aromatic flavor profile, consider this blend:
- 1 tablespoon Kosher salt per 4 pounds of turkey (e.g., 4 tablespoons for a 16lb turkey)
- 1 tablespoon dried rosemary
- 1 tablespoon dried thyme
- 1 tablespoon dried sage
- 1 teaspoon garlic powder
- 1 teaspoon black pepper
- Optional: Citrus zest (orange or lemon) for a brighter note.
Mix all these ingredients thoroughly in a small bowl.
Step 2: Prepare Your Turkey
Remove the turkey from its packaging. Discard any giblets or neck from the cavity (save them for gravy!). Using paper towels, thoroughly pat the entire surface of the turkey dry – inside and out, top and bottom. This step is critical; the drier the surface, the better the salt will adhere and the more effective the brining process will be.
Step 3: Apply the Dry Brine
Generously rub your dry brine mixture all over the turkey. Be sure to get into every nook and cranny, including under the skin of the breast and thighs (gently separate the skin from the meat with your fingers), inside the cavity, and along the drumsticks. Don't be shy; the salt is what makes this method work so well. Ensure even coverage to prevent overly salty spots or unseasoned areas.
Step 4: Refrigerate, Uncovered
Place the brined turkey on a wire rack set inside a baking sheet. The rack allows for air circulation around the entire bird, which is essential for proper drying. Crucially, place the turkey uncovered in your refrigerator. This allows the skin to dry out, setting the stage for that beautifully crispy finish. Refrigerate for at least 24 hours, and ideally up to 48 hours for turkeys 15 pounds or more. While a minimum of 8-12 hours will yield some benefits, the longer duration allows for deeper flavor penetration and more significant skin drying. This advance prep also makes Thanksgiving Day less stressful, allowing you to get ahead for a flavorful, crispy Thanksgiving.
Step 5: Rinse and Re-Pat Dry (Before Roasting)
On roasting day, remove the turkey from the fridge. This is one of the rare instances where rinsing a turkey is advised. Rinse the turkey thoroughly under cool running water to remove any excess salt from the surface. Then, and this is important, pat the turkey extremely dry again with paper towels. Any residual moisture on the skin will hinder crispiness. Your turkey is now ready for roasting.
Step 6: Roast to Perfection
At this point, you can proceed with your favorite roasting method. Many enjoy slathering the turkey with an herb butter mixture before it goes into the oven. You may find that your dry-brined turkey roasts 15-20 minutes quicker than a traditionally prepared bird, so keep an eye on the internal temperature (165°F in the thickest part of the thigh, without touching bone).
Tips for Dry Brine Perfection
To ensure your dry-brined turkey is nothing short of magnificent, keep these expert tips in mind:
- Quality Kosher Salt is Key: As mentioned, Kosher salt (like Diamond Crystal or Morton's) has a larger, flakier crystal structure compared to table salt. This makes it easier to handle, less likely to over-salt, and promotes even absorption.
- Don't Fear the Salt Amount: While it might seem like a lot of salt initially, remember that a significant portion will be rinsed off. The goal is adequate coverage for the brining process, not to make the final dish overly salty.
- Prioritize Drying: The "uncovered in the fridge" step is paramount. Good air circulation is vital for dehydrating the skin, which is the cornerstone of achieving that coveted crispy exterior. Make sure your fridge is clean to avoid transferring unwanted odors.
- Timing Matters (But Offers Flexibility): While 24-48 hours is ideal for comprehensive results, even an 8-12 hour dry brine will make a noticeable difference in flavor and moisture retention. Plan accordingly with your holiday schedule.
- Experiment with Aromatics: Feel free to customize your dry brine mixture. Beyond classic herbs, consider adding onion powder, smoked paprika, a pinch of cayenne for heat, or finely ground dried mushrooms for umami depth.
- Avoid Injecting Liquids: With a proper dry brine, injecting additional liquids is unnecessary and can counteract the drying process of the skin.
Conclusion
Dry brining a turkey is more than just a technique; it's a revelation. It takes the stress out of holiday cooking by offering a straightforward, mess-free path to a bird that is unparalleled in juiciness, tenderness, and flavor. No more wrestling with giant buckets of liquid, no more sacrificing crispy skin for moist meat. With just a simple salt rub and a little patience in the refrigerator, you'll unlock the secret to the most delicious Thanksgiving turkey you've ever tasted. This year, ditch the wet brine and embrace the effortless perfection of the dry brine. Your taste buds, and your clean kitchen, will thank you.
